How Professionals Create Sharp and Detailed Embroidery Files

Sharp embroidery does not happen by chance. It comes from careful planning, skill, and the right file setup. Every clean stitch you see on fabric starts with a well-built embroidery file. If the file is weak, the final result will also look weak.
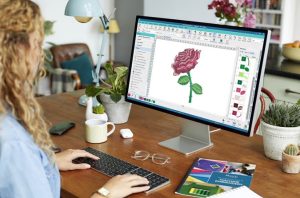
That is why many businesses rely on Custom Embroidery Digitizing Services when they want clean and accurate stitch work. Professionals do not just convert artwork. They rebuild it for machines so every detail stays sharp, smooth, and easy to stitch.
What Is an Embroidery File?
An embroidery file is not a normal image. It is a set of stitch instructions.
It tells the machine:
- Where to stitch
- How to move
- When to stop
- When to change thread
- How dense stitches should be
- What path to follow
Without these instructions, a machine cannot create a design.
Why Sharpness Matters in Embroidery Files
Sharp designs make embroidery look premium. Blurry or rough files do the opposite.
Sharp Files Give:
- Clear edges
- Easy-to-read text
- Smooth curves
- Clean fills
- Strong brand look
Weak Files Cause:
- Broken lines
- Clumped thread
- Uneven shapes
- Poor visibility
- Low-quality finish
In embroidery, detail is everything.
Real Experience: What Happens Without Proper Files
Many beginners try to use simple images as stitch files. At first, it seems fine. But when stitched, problems appear.
Letters may close up. Borders may shake. Small details may disappear. Fabric may even get damaged.
This is why experts like Absolute Digitizer rebuild artwork into proper stitch data instead of just converting it. That extra care makes a big difference in final output.
Step 1: Understanding the Original Artwork
Professionals never start stitching right away. First, they study the design.
They Check:
- Line quality
- Shape clarity
- Small details
- Color sections
- Size limits
This helps them decide how the stitch file should be built.
Step 2: Cleaning the Design
Not all artwork is ready for embroidery.
Common Cleaning Tasks:
- Removing noise
- Fixing blurry edges
- Simplifying shapes
- Adjusting proportions
Clean artwork leads to clean stitches.
Step 3: Choosing the Right Stitch Type
Different parts of a design need different stitches.
Common Stitch Types:
- Satin stitch for text and borders
- Fill stitch for large areas
- Running stitch for outlines
Professionals mix these carefully for smooth results.
Step 4: Setting Proper Stitch Density
Stitch density controls how tight stitches are.
Too High Density:
- Fabric gets stiff
- Thread breaks
- Design looks heavy
Too Low Density:
- Gaps appear
- Design looks weak
- Fabric shows through
Experts balance it based on fabric type and design size.
Step 5: Creating Smooth Stitch Paths
Stitch path means the order and direction of stitching.
Good Path Means:
- Less jumping
- Faster sewing
- Smooth movement
Bad Path Means:
- Backtracking
- Extra trims
- Machine stress
Good path planning is key for sharp results.
Step 6: Adding Underlay Stitches
Underlay is the base layer of stitching.
Why It Matters:
- Supports top stitches
- Stops fabric shifting
- Improves shape stability
Without underlay, designs can look uneven or loose.
Step 7: Handling Small Details Carefully
Small parts like letters or icons need extra attention.
Common Problems:
- Letters closing
- Thin lines breaking
- Tiny shapes disappearing
Professionals adjust stitch type and density to protect detail.
Step 8: Testing the Stitch File
A design is never complete without testing.
Testing Helps:
- Catch hidden issues
- Check fabric behavior
- Fix density problems
- Improve final look
Many experts run sample stitches before final production.
Why Machine Settings Alone Are Not Enough
Some people think the machine can fix everything. That is not true.
Machine Controls:
- Speed
- Tension
- Movement
Design Controls:
- Stitch density
- Path direction
- Underlay
- Shape structure
Both must work together for sharp results.
Common Mistakes Beginners Make
Using Low-Quality Images
Blurry images lead to weak stitch files.
Ignoring Fabric Type
One setting does not fit all materials.
Overcomplicating Designs
Too many details can ruin clarity.
Skipping Testing
This leads to production errors.
Why Experts Get Better Results
Professionals do not rush. They follow a clear system.
They Focus On:
- Clean artwork preparation
- Proper stitch planning
- Balanced density
- Smooth flow
- Real fabric testing
This process creates sharp embroidery every time.
Real Business Example
In embroidery shops, speed matters. But speed without quality leads to mistakes.
That is why many brands trust Absolute Digitizer for file preparation. Clean files reduce machine errors and help production run smoothly without delays.
EEAT in Embroidery File Creation
Good embroidery work follows trusted principles.
Experience
Real stitching knowledge and practice.
Expertise
Understanding of stitches, fabric, and machines.
Authority
Consistent delivery of clean results.
Trustworthiness
Reliable, tested, and accurate files.
These build confidence in every design.
Why Sharp Files Improve Branding
For businesses, embroidery is part of identity.
Sharp Files Help:
- Make logos look premium
- Improve customer trust
- Strengthen brand image
- Increase product value
A clean stitch file reflects a professional brand.
Tips Professionals Always Follow
Keep Designs Simple When Needed
Not every detail should be stitched.
Match Fabric Before Starting
Planning avoids later issues.
Balance Density Carefully
Too much or too little hurts quality.
Always Test First
Never skip sample stitching.
Save Original Files
Always keep backups safe.
Why Sharpness Depends on File Quality
Even the best machine cannot fix a bad file.
Good File = Good Output
Bad File = Poor Result
That is the simple rule of embroidery.
Final Thoughts
Sharp and detailed embroidery files are not created by accident. They come from careful design work, smart planning, and real experience. Every step matters—from artwork cleaning to stitch path control.
When professionals build files, they focus on clarity, balance, and machine behavior. That is why results look smooth and strong on fabric.
With expert help like Absolute Digitizer, businesses and creators can turn simple artwork into sharp, high-quality embroidery that looks professional every time.


Post Comment