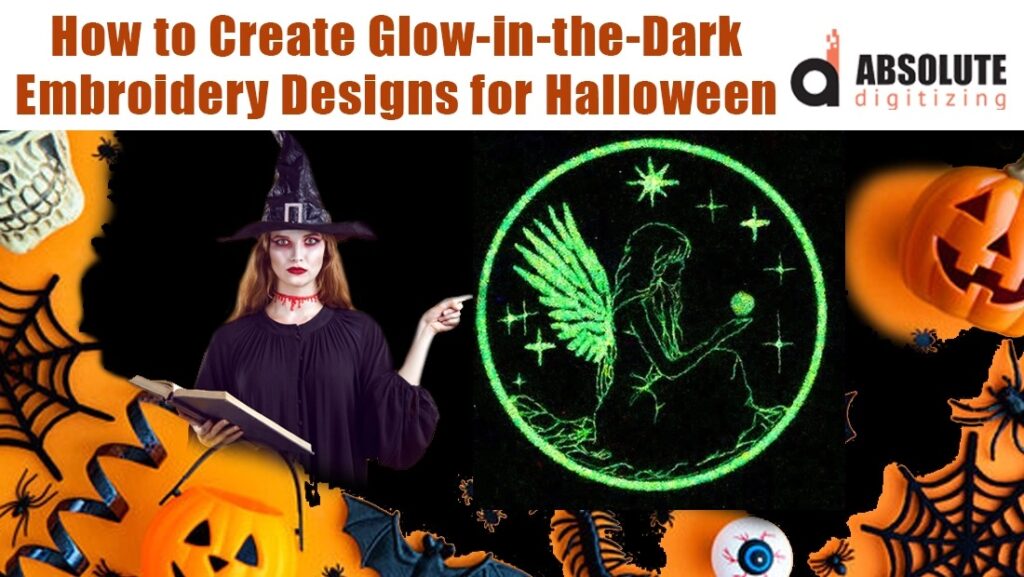
Imagine an embroidery project that doesn’t just hang on the wall but comes alive when the lights go down. Picture a child’s backpack with a constellation that glows softly during a night walk, or a party jacket with designs that pulse with energy under black lights. This isn’t a far-off fantasy; it’s the exciting reality of incorporating luminous elements into your hoop art. But to truly unlock the potential of these magical materials, you need to think about your design process from a new perspective. Moving from a simple idea to a stunning, glowing finish requires a specialized approach, and that is where the magic of glow in the dark embroidery digitizing comes into play.
What Makes Digitizing for Glow Different?
If you are familiar with machine embroidery, you know that digitizing is the process of converting an image into a digital file that an embroidery machine can read, using commands for different stitch types. When you are working with glow-in-the-dark or UV-reactive thread, this process needs a few tweaks. Standard digitizing is designed for visual appeal in normal light. Digitizing for glow, however, is about optimizing for luminosity and impact in low-light conditions.
The key difference lies in stitch choice and density. To maximize the glow effect, you need a solid, dense surface area for the special thread to absorb and emit light effectively. This often means favoring satin stitches and dense fill stitches over open, delicate running stitches. A thinly outlined design will barely glow, but a solid, filled shape will shine brightly. This fundamental shift in priority is the core of effective glow in the dark embroidery digitizing.
Planning Your Design for Maximum Glow
Before you even open your digitizing software, grab a sketchbook. Think about which elements of your design are truly meant to be the light source. You do not need, and probably should not, make the entire design glow. The most effective pieces use glow as an accent to create focus and drama.
For instance, if you are digitizing a spooky Halloween pattern of a haunted house, you would want to assign the glow effect only to the windows and the moon. If you are creating a space-themed design for a child, the planets and stars should be the glowing elements, not the rocket ship. This strategic planning helps you create a digitizing file that uses the special thread efficiently and to its greatest dramatic effect. By isolating the luminous parts, you make them pop against the non-glowing background.
Stitch Type and Density: The Heart of the Process
This is where your digitizing skills get a fun upgrade. To achieve that vibrant, lasting glow, you need to ensure the designated areas are stitched with a high density. A fill stitch with a density that might be perfect for standard rayon thread could be too sparse for glow thread, allowing the dark fabric to show through and dim the effect.
When you set up your file, increase the stitch density for your glow elements. You might also consider using an underpinning stitch, like a tatami fill, to create a solid base before the top layer of glow thread is applied. Furthermore, pay close attention to the stitch direction. For a large fill area, a strategic stitch direction can help the thread lay smoother and reduce the chance of breaks or puckering, which is especially important with the sometimes less-flexible glow threads.
Tackling Thread Challenges in the Digital File
Glow-in-the-dark thread, often made from phosphorescent polyester, and UV-reactive threads can have different physical properties than their standard counterparts. They can be slightly thicker, more brittle, or have more texture. A skilled digitizer anticipates these challenges within the file itself.
To prevent thread breaks, you can adjust the pull compensation and reduce the stitch speed for those specific color stops in your machine. You might also design your file to use shorter stitch lengths in complex curves to maintain better tension and definition. If you are combining glow thread with standard threads in one design, it is a good practice to digitize the glow elements last. This minimizes the number of times the machine has to thread and re-thread the special spool, streamlining the process.
From Digital File to Dazzling Reality
Once your file is ready, your fabric choice becomes the next critical decision. For the most dramatic impact, pair your glowing design with a dark background. Black, navy, and deep purple fabrics act like a nighttime canvas, making the glowing elements appear brighter and more vivid. If you are using UV thread, a black background is non-negotiable for the most intense neon effect under a black light.
Remember to test, test, and test again. Stitch out a small section of your glow element on a scrap piece of your project fabric. Check it in a dark room to see if the density is correct and the effect is what you envisioned. This small step can save you from wasting precious materials and ensure your final project is absolutely perfect.
Conclusion: A New Dimension in Embroidery
Embracing glow in the dark embroidery digitizing does not just add a new trick to your skill set; it opens up a whole new dimension for creative expression. It allows you to create projects that are interactive, surprising, and unforgettable. Whether you are personalizing gifts, creating stunning home decor, or designing eye-catching apparel for events, the ability to make your stitches literally shine sets your work apart. So, open your digitizing software with a new goal in mind. Think beyond the daylight and start designing for the dusk. Your next project is not just an embroidery; it is a light-up masterpiece waiting to happen.